Showing posts with label butterfly brilliance. Show all posts

Friday, 8 March 2024

Scrappy Friday


My tutorial today uses one 3" strip of 12 x 12 papers
and a few note cards and envelopes.

You can watch my tutorial here.

I have used my retired stash for the paper and card along with
the gorgeous Timeless Arrangements bundle.

I would like to enter these into

It's dull as ditch water here today so just heading out
for a dander around the shopping centre.
Have a lovely weekend everyone.

Tuesday, 10 January 2023

Butterfly Brilliance


Our new challenge theme over at
has been chosen by Sandie and she wants to see
THINGS WITH WINGS.

I dug out my Butterfly Brilliance stamp set,
stamped the background and added some colour around them.
The butterfly on top was die cut from my papers
and the sentiment was stamped using Lovely You stamp set.
I matted it onto black card and finished
with an eyelet and ribbon.

Hope you get time to join us.

I am entering this into

Wet and miserable day today!
Plenty to keep me busy in the craft room.
Have a lovely day!!

Tuesday, 9 August 2022

Best moments!


Our new challenge theme over at
has been chosen by Valerie and she wants us
to use spots and/or stripes.

I found some scraps which worked perfectly.
They have been layered up then I added the die cut
butterflies. The sentiment was stamped onto white card,
punched out and layered onto black card.
I finished with some cord.
Quick and easy theme this fortnight for sure
so I hope you get time to have a play.

I am entering this into


Friday, 3 June 2022

Jewellery gift box


I made this little gift box to match my purse

from last weeks tutorial.

The jewellery did not come in a very nice box

so I made one to suit.

I have used the same colourways but this time finished with a

belly wrap and a die cut butterfly. Inside is stamped using the

matching butterfly from the Butterfly Brilliance bundle and

the sentiment is from Elegantly Said stamp set.

You can watch my video here

Measurements needed to make the box

Card base - 3 1/2" x 7 1/2"

Score short - 1/2", 3"

Score long - 1/2", 3 1/2", 4", 7"

Dsp to decorate

Front and back - 2 1/4" x 2 3/4"

Sides - two at 2 1/4" x 3/8"

two at 2 3/4" x 3/8"

Card inside - 2 7/8" x 2 1/4"


I would like to enter this into


Saturday, 18 September 2021

Stamp of the moment!


It's midway through our challenge at 
where the theme is your
stamp of the moment!
Remember we have a lovely prize up for grabs so come and join us!


For my card today I have used a mix of my favourites!!
Well it is hard to choose one set lol.
The background has been embossed using an old rose embossing folder
and layered onto fresh freesia card.
The fresh freesia papers have been die cut using the ornate layers dies.
I cut an oval in white for my sentiment and flowers.
The spray has been made up by stamping and die cutting
pieces from the Forever Fern Stamp and die set,
an absolute favourite for me!!

The sentiment (Timeless Tulips) was stamped in fresh freesia ink along
with the butterfly from the Butterfly Brilliance stamp set
and die cut using the Brilliant Wings dies.
Thinking of You sentiment is from Beauty of Friendship
stamp set and I added a few metallic pearls to finish.

I hope you get time to join us!

I would like to enter this into

Product List


Sunday, 4 July 2021

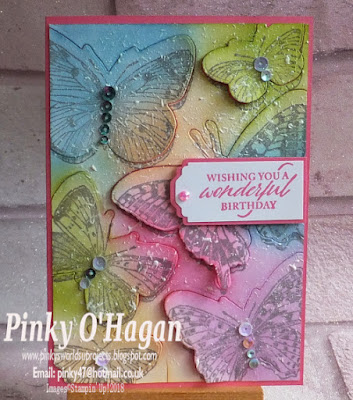
Summer Butterflies at stamping sensations


Our challenge over at
this month has the theme
FOR A LADY.

We are sponsored by

so be sure and join us for the chance to win a
 £25 Shopping Voucher with them!

I saw a card on Pinterest using this idea but with flowers
so I thought I would try it with my butterflies.

I started by inking up the background using
I then stamped using Butterfly Brilliance in
basic grey ink and then cut it out using the matching die.
Keeping it as one piece I flipped it over
and using double sided tape I held parts together
that I didn't want to fall apart.
When I turned it back over, I curled up
some of the wings and added a tiny 3d foam square.
It was then splashed with some gesso and when dry
I added it to my polished pink card base.
To finished I added some  sequins
to the bodies of the butterflies.
The sentiment was stamped and punched

I would like to enter this into

I hope you get time to join us this month!


Tuesday, 29 June 2021

Vintage style at Tag Tuesday


Our new challenge theme over at
has been chosen
by Valerie-Jael and she wants to see
Vintage Tags.

I am not very good at vintage at all
but will give anything a go!

For this tag I started with a piece of crumb cake card.
I stamped the butterflies from the Butterfly Brilliance stamp set
and then over stamped the sentiment to fill the gaps,
off stamping to get a lighter text.
I then punched out the top with the scallop tag punch
and inked around the edges using cinnamon cider ink.
I coloured the butterflies using Spectrum Noir pencils,
in nice vintage colours.
I found the label in an old Stampin' Up! kit
and stamped the same text sentiment from the
I inked around the edges in cinnamon cider
and adhered to my tag.
The flowers where punched using the 
with the pencils and inked with the cinnamon cider.
I added a pearl to each flower
and stuck in place.
To finished I added a bit of lace to the tag top.

I would like to enter this into
Coloured with pencils

Hope you get time to join us.


Saturday, 19 June 2021

Sketch 14 - Butterfly thank you


My card today follows Sketch 14

This card has the exact same layout as sketch 14
only I have gone with different colours, papers
and ribbon.
I think this layout was my favourite.

I have used the butterfly bijou papers
along with brights dsp.
The card is daffodil delight and I used my
The ribbon is mint macaron (retired)
and the butterfly has been die cut using
The sentiment is from Beauty of Friendship
stamp set and daffodil delight ink.

I would like to enter this into

Just finished off the fence painting before
it gets too hot outside. 🌞
Hope you have a lovely day!


Wednesday, 9 June 2021

Vintage Butterfly Photo Box Tutorial


I had made one of these photo boxes for a friend
recently and she had a friend who saw it
and of course requested one.
The first one was filled with photos of someone
they had lost but you could make them themed
for any occasion....
anniversary, new baby, new house, graduation etc.

So I thought I would made a video while doing the second one.

You can watch it here.


Measurements needed to follow along
Black card - 2 pieces - 5 1/2" x 5 1/2"
Score 1 1/4" all sides
Slide out slightly for lid scores (see video)
Paper - 2 by 2 3/4" x 2 3/4"
4 by 1" x 2 3/4"

I have used Basic black card,

I would like to enter these into
1. mini album 2. encouragement 3. 3D embellishment

My diary is filling up fast with baby sitting duties
with the school holidays nearing!
Think I should put my fees up 😂
but it will be fun to get to spend some times
with my Grandsons.


Related Posts Plugin for WordPress, Blogger...