Newsletter

Showing posts with label inspired events. Show all posts

Wednesday, 23 April 2025

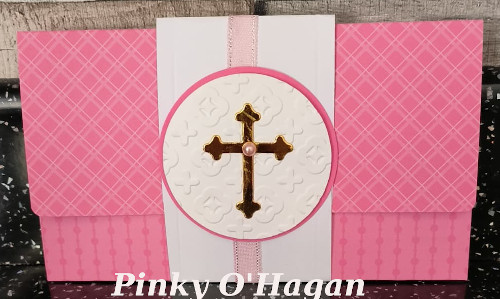
Confirmation time


My Grandson Sean will be making his Confirmation
in May and this is the card I made for him.

I saw lots of these on Pinterest and I see you can
buy the card and templates online but I
just had a crack at it myself.


It does fold fairly flat for an envelope but I won't be posting it.

I printed the background papers from a Nitwits file
and added my wording for the prayer and greeting
before printing.
It has all been matted onto some nice blue card.
I then used my dies and a Crafts you Print
confirmation cross for the centre.
The nice die cuts are from a Tattered lace pack
and I punched out some small crosses
and added a pearl and gem here and there.
I also punched two small leaves for the bottom.
Took me a while to complete after working out
my cuts but fairly pleased with the outcome.

I would like to enter this into


Friday, 1 November 2024

Gift Wallet


I also made this wallet to go along with the
Christening Album I shared on Wednesday.

It has two pockets, one on the inside and one at the back.

I put a mini card in the inside pocket


and money in the back pocket.
The belly band held it all secure.

I used a stamp set called Inspired Events (SU).


The cross was die cut using a spellbinders die
and the papers are old ones from SU.
The little card is from a Memories and more pack called
Bright and Beautiful.

I would like to enter this into

Have a great weekend everyone!


Wednesday, 10 April 2019

Inspired Events Confirmation card


My Niece's daughter is celebrating her Confirmation this week
and this is the card I made for her.
Really feeling old when I'm making cards for my Niece's children!!
I used Inspired Events stamp set. You should check it out
as it is super useful for these religious occasions and lots more.
I actually use the little rose to make my own calling cards!


How to make this card
1. I used a 5" x 7" card base.
2. Cut your mat 4 6/8" x 6 6/8" in powder pink
3. Cut piece of whisper white 4 1/2" x 6 1/2"
4. Stamp top and bottom border stamp in powder pink ink
5. Stamp congratulations and confirmation in powder pink.
6. Stamp the crosses in grey ink lining each up under the points as above.
7. Draw a pencil line 5/8" above bottom border point
and stamp the child's name in powder pink.
TIP count the letters in the name and start with the centre letter
and work your way out.
Adhere all your layers to your base card.
8. Cut a 6" strip of powder pink ribbon, join both ends in centre
and hold with sticky dot.
Cut  1" of same ribbon, add double sided tape and wrap around centre
of your bow, sealing at back.
Add more sticky tape to back of bow and some wet glue
and stick in place.
9. Add some pink pearls to both crosses.
10. Stamp 3 small rose base stamps in powder pink
and over stamp in pink pirouette ink.
Cut them out, add to card with dimensionals and finish
them with some wink of stella.

Check out my product list to see what I have used for this card.

I would like to enter this into
Addicted to Stamps and more - anything goes
Crafty Creations - anything goes
Word Art Wednesday - anything goes
Crafty Sentiments  Designs - only for the girls
Tuesday Throwdown - anything goes


Product List
Keep blog land alive by commenting and following blogs.
I am on the lookout for new bloggers, so follow me or leave a comment
and I will come check you out!
 Thanks for dropping by today.


Those leaving a comment on any post on this blog do so in the knowledge that their name and blog link are visible to all who visit this blog.
I personally, do not use any of your information.


Monday, 19 November 2018

I'm lucky.....


This started out to be a monochromatic card but I just couldn't resist adding some colour
to the flower and leaves!
I used a few stamp sets to create these card but it was pretty simple to do.

I would like to enter this into:
Pammie's Inky Pinkies - anything goes
Crafting from the heart - anything goes

Keep blog land alive by commenting and following blogs.
I am on the lookout for new bloggers, so follow me or leave a comment
and I will come check you out!
 Thanks for dropping by today.


Product List


Don't forget our limited edition snowflake collection!!


Enjoy £130 worth of craft goodies of your choice for £99


Thursday, 28 June 2018

Cutest tote bag ever!


Is this not the cutest way ever to give a money gift or voucher gift?


It measures 3 1/4" wide by 2 1/2" high (not including handles), and 1'' depth.
Perfect to hold money, chocolate, voucher etc.

This was so simple to make and I will tell you how to do it below.
I love how the inside is decorated perfectly to match.
The stamped words are from Tabs for Everything
and the Rose is from Inspired Events, leaves from Flourishing Phrases

So just get your 6 x 6 paper, score at 2 1/2" and 3 1/2"
Score your folds and at each side of those folds cut along the score line for about 2"
on each one.
Lay your paper out flat and fold the two taps you just made into the centre and glue.
Put glue down either edge of the bottom section and proceed to 
curve these round the opposite sides to form the shape of the bag.
Stick in place.
Pinch either side of the bag top slightly, to help with the shape.
Cut two strips of matching dsp 1/2" x 6", curl slightly, add adhesive
to both ends and stick on as handles for your bag.
Punch a circle, stamp the wording, punch a scallop and 3d them together.
Punch a small hole through both and add some string to attach to handles.
You can now decorate as above or as you like yourself. 

If you have a go, leave me a comment as I would love to come check it out!
Thanks for dropping by today.


Saturday, 23 June 2018

Special event!


I have made a Christening/baptism card today.
Quite simple but very elegant and perfect for the occasion,
don't you think?
Change the wording and it could become a wedding invitation.

I used my lovely
Inspired Events stamp set


along with Soft Suede ink pad
and the very gorgeous 

The card has been finished with pearls!

To make this card:
1. Cut your corner die using whisper white card
2. Adhere using liquid glue
3. Stamp your sentiments using blocks or stamparatus in Soft Suede
4. Embellish with pearls.

Simple, quick and easy!
You could easily do these as Christening/First Communion/Confirmation
cards or invitations. Change your ink colour for boy or girl.
And if you are using the Stamparatus you can leave your stamps in place
and just repeat stamp a bunch of cards.


I would like to enter this into:


Add the Stamparatus to your kit for a great savings!


Thursday, 21 June 2018

Butterfly treats!

Top #5 Badge


I have an extra tutorial this week!

I love to send wee bars of chocolate to my Mother-in-law
and her favourite is Fry's chocolate cream bars.
So this time I thought I would pimp them up and make some nice boxes.
This box will hold 2 full size bars!

For the pink box I used

For the white box I used

For both boxes I cut the butterfly from Springtime Impressions thinlits
I stamped using the tiny rose stamp from Inspired Events stamp set.
Again I used my Simply Scored and bone folder.

You can check out my tutorial below (or click to go to YouTube)


I would like to enter these into:


Friday, 25 May 2018

First Communion card


My card today is for a First Communion.
A special day in lots of little lives every year.
I used a brand new stamp set for this one which is called


It covers occasions like Christening, Baptism, Blessings, Confirmation and Holy Communion.
Perfect! It also has lovely little roses, a cross, a dove, fancy corner stamps, border stamps etc.
It's well worth the spend in my opinion.
You can get this stamp set HERE.
I teamed this one with pool party card and pool party ink.

I will come back again with more samples as I like to make at least 4 projects
with any stamp set I buy.

I would like to enter this card into:
Crafting with Friends - anything goes
Creative Fingers - anything goes


Come join me, I would love some new crafty friends!

Related Posts Plugin for WordPress, Blogger...