Monday 30 April 2018

Celebrate your day!


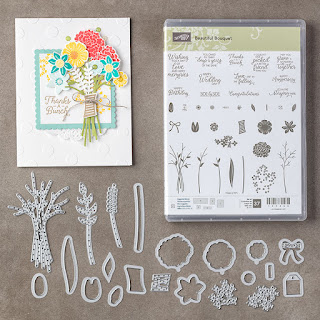
Today I have made an eclipse card using  the gorgeous stamp set


which comes in the Share what you love bundle
which is available tomorrow!!
Click my shop online button below to check it out on 1st May.
Why not start the month of May with a treat for yourself!!

This stamp set is full of alphabets, numbers and very useful sayings for the
back of your cards i.e.
handstamped by, from the desk of, made with love, deliver to,
the list goes on and on!

I used the alphabets to stamp out YOUR DAY using Berry Burst ink spot.
I then watercoloured them using the same ink.

The celebrate die is from Sale-A-Bration which is now over but
the good news is this die will be available in the new catalogue in June!!
I cut the word about 5 times in total and glued each on top of the other to
get some depth.
Remember to keep the little bit from the first cut from your stamping
and fill in the necessary pieces.

I would like to enter this into:

Thanks for dropping by and leaving a comment.
I really appreciate it and love reading them all!


You could buy this gorgeous bundle today if you sign up as a demonstrator!!

Saturday 28 April 2018

Adding dimension

Top 3 Badge


I had time to have a play with my new Share what you love bundle today!
I am super excited that you, the customer, will be able to buy this bundle
between the 1st May until 31st May
but remember you won't be able to get this after that.
So please if you love it, get your order in early. you won't regret it.
I was super good to myself and got the
GOTTA HAVE  IT ALL bundle!!
Well you do get 3 free items and who doesn't like something free!!


So for my card I went with the stamp set from the bundle called
Love What You Do
and stamped the flower and sentiment in
Lemon Lime Twist and Grapefruit Grove
I stamped the flowers out twice and raised them on dimensionals.
I used the Grapefruit Grove and a little bit of water to colour the flowers.

I really enjoyed all the stamping!!

I would like to enter this into:

Hope you like my card and it gives you some inspiration to start stamping too!
Thanks for dropping by.


Thursday 26 April 2018

Tutti Frutti Matchbox


I made these cute little matchbox style gift boxes today
using some of my 6 x 6'' papers from the gorgeous


Wouldn't they be perfect as favours for a wedding or baby shower!
Maybe even a gift for parents who attend a kids party.

I have a tutorial available on You Tube.
If you get time to watch and like it, I would love you to become a subscriber.
I need all the encouragement I can get lol.


Measurements:
Scraps of card and white card for circles

Hope you enjoy this tutorial
and many thanks for dropping by!


All items can be purchased in my store


If you fancy joining my team May would be an ideal time
as you will get to see the new catalogue
a month before everyone else and get to order
special items in your starter kit!!


Wednesday 25 April 2018

Thankful for you


I have created another card using the
SHELTERING TREE

stamp set.

This time I went very inky/messy.
Not sure this is my thing but I DID enjoy it!
And who says there is a right way and a wrong way to do things....not me lol.

This card is for a Priest on his birthday and I thought the tree would be ideal for him.
He is a Priest out in South Africa and I make a card for him every year for this lady,
so was running out of ideas. So glad I joined Stampin' Up! as my horizons have broadened
along with my skills, in many many areas.

But back to my card.
I again used:
I cut a circle using Framelits and did all my stamping and sponging inside.
I stamped and tore the edges of the sentiment and raised with dimensionals.
It was finished with two matching pearls.


Come join my team!!


Tuesday 24 April 2018

True Gentleman Waterfall card


Today I am sharing a Waterfall Card!
I love a card with a bit of movement and this one is so easy to make and
is great for showcasing a variety of stamps.
I have made a tutorial over on You Tube if you would like to watch it.
And of course a THUMBS UP would make my day!


For my card I have used:
Celebrate You Thinlits
(will be available in new catalogue in June)


Measurements needed:
Strip of navy 2 1/2'' x 7 3/4''
Score at 2'', 2 3/4'' and 3 1/2''
1 strip of navy - 1'' x 4''
3 pieces of navy - 2 1/2'' x 2''
1 piece whisper white - 2 1/4'' x 1 3/4''
(you can do 3 pieces this size if you are not using the tag punch)

I am entering my pink waterfall card into


Monday 23 April 2018

Friendship is a ...........

TOP THREE BADGE


I finally got the courage to delve into this beautiful stamp set called

I was always afraid of it as it looked so arty and way above my capabilities
but it was one of the most enjoyable sets to work with!
Just look how many stamps you get in this set!!

It made stamping such a joy with the ground stamps, flower stems, tree and separate
types of flowers to add.
I can imagine using this for lots of occasions from birthday celebrations,
family tree additions to sympathy etc.
With the separate tree and leaves/flowers it will be so easy to touch all
four seasons.

So for my card today I used:
Embellishments - red ribbon, red bows, punched heart
I chopped the sentiment apart and layered in red.
I added some highlight with a white gel pen

I am really happy with my card and will definitely be coming back for more!

I would like to enter this into:


Thanks for dropping by today


If you would like to buy any products featured here today click on the highlighted links
or just click below to shop all

 Join  today and save money on all these items and more!


Sunday 22 April 2018

Birthday Bouquet!


Hello!
Today I am sharing a card I made using the lovely

stamp set.
I did actually buy the complete bundle of this set which saved me 10%
and it was lovely to be able to cut the blooms out so easily.

You get quite a lot of dies in there!!
I went with nice pastel colours for this card as it is Spring afterall (isn't it!!)
You would never know from the weather, that's for sure!

So anyway for my card I used:
Gems and Organza ribbon

I stamped and cut all the flowers using the dies.
The base card was stamped using the small cluster of flowers in Daffodil delight.
Originally I intended to just do a bunch of flowers but as my card progressed
I decided to make a little vase for them.
I scored lines down the green card to add some texture.
The sentiment was stamped and I then tore the edges for even more texture.
Everything was assembled and finished with gems and a ribbon.

I am entering this into:


Thanks for stopping by and leaving a comment.


You can shop all these items in my online shop


Why not save some money and get these items cheaper by joining my team!!


Have a great day!


Friday 20 April 2018

Party Gift Bags!


Today I have some cute Party gift bags to share with you!
I love these and they are so quick and easy to make!!

These two are going to my Grandsons Sean and Tom, hence the large letters
I have decorated them with.
Wouldn't they be great for birthday gifts if your child was invited to a special birthday,
or for you to have at your own child's birthday!
I love that they can be personalised and put together so quickly.

For my bags I have used:
Bubble Over DSP 
ribbon or twine

You can follow my tutorial here


and download all items and measurements


Thanks for stopping by!


remember to check out the clearance rack for a bargain!


I would be super excited to have you on board!!


Related Posts Plugin for WordPress, Blogger...